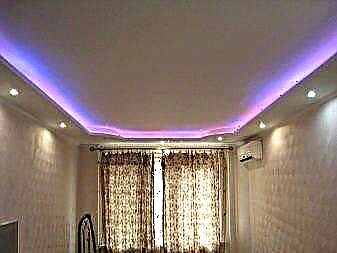
A two-level stretch ceiling with lighting is a profitable interior solution that allows you to emphasize the height of the room, add bright colors to it when using films of various colors or zoning the room.
A two-level ceiling with illumination is most often installed in a hall or a living room, because such three-dimensional structures require space in order not to create the effect of limited space. However, with skillful decoration, it is possible to use two-level ceilings in the bedroom and even in the hallway, despite its size.
A multi-level stretch ceiling is an interesting design, but before manufacturing or planning it is worth familiarizing yourself with a number of nuances.

Options for the performance of two-level masterpieces
You can create a two-level ceiling in various ways using both ordinary PVC film for tension structures and a combination of several different materials. The most popular design options are:
- Two levels of PVC - for two levels of construction, a PVC film is used, giving the surface uniformity and a solid appearance. To enhance the decorative characteristics, you can use materials of various colors. Choosing shades, it is worth remembering that the options look advantageous when the lower tier is made in a dark matte color, and the upper one in light glossy.
The combination of drywall with a stretch ceiling - the option most often used is when a box of drywall is created along the contour of the room, and inside it, a second, upper level of stretch PVC film is mounted. In this case, the texture game looks advantageous, the combination of a light glossy stretch coating, with opaque and matte drywall. For the decor of the box, you can use decorative putty or interior wallpaper.
You can choose a winning combination, taking into account the height, area of the room and other parameters that allow you to choose the right solution in the hall, nursery or bedroom.
Features and nuances of installation
When making a two-story ceiling, it is worth considering a number of nuances that will allow you to create a durable and aesthetic design:

- Most of the load during installation falls on the walls, so it is worth considering their strength. It is optimal to mount the structure with fastening to reinforced concrete walls, if the walls are made of brick, the profile for two-tier suspended ceilings should be fastened with a greater frequency, on average - 1 dowel every 20 centimeters,
- It is important to correctly mark out without distortions and differences in height, since in the finished form, a two-tier structure with drawbacks will produce an extremely untidy impression. You can level the height using the building level, special cables for marking the wall and other tools,
- For internal or contour lighting located in the immediate vicinity of the PVC surface, LED or halogen lamps should be selected that do not heat the air and are not able to deform the tension surface.
Backlight Options
In the options for highlighting two-level stretch ceilings, you can use several interesting points of location of lighting equipment:
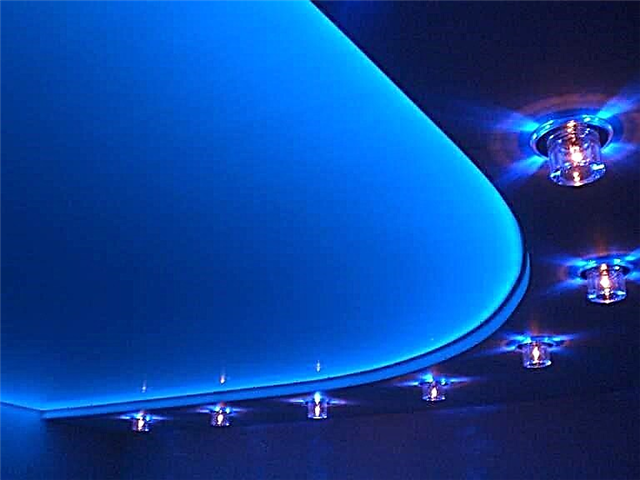
- Contour internal - lighting technology is located along the contour of the ceiling, highlighting the surface and scattering light around the room,
- External contour - located outside, under the side of the second tier, as a rule, they are used for decorative purposes to emphasize the transition between surfaces,
- External main - lamps are located on the surface, used, as a rule, for the lower tier, can also serve as the main lighting in the room,
- Internal - lighting is located under a stretch ceiling, as a result, diffused lighting of the room is created,
- Combined - the lower suspended tier is highlighted by external recessed fixtures, the upper level is illuminated internally.
A box with illumination around the perimeter in most cases plays the role of the main lighting, for this reason sufficiently powerful recessed luminaires with diode, halogen or incandescent lamps are selected. At the same time, the stretch upper ceiling with LED backlighting is needed for decoration. For it, colored lamps, LED strips laid out in the form of a geometric pattern can be used. Also interesting is the option of a separate arrangement of diodes to create the effect of a starry sky.
Benefits and possibilities of using lighting
Before you make a two-level ceiling with backlight, you should evaluate all its advantages and possible disadvantages. Among the advantages, first of all, we can distinguish aesthetic appeal. A complex transition system and broken geometry can give the room additional depth, divide it into separate zones and sections. Interesting lighting options also complement the interior.
For example, by installing an LED strip, you can create a pattern that will resonate with the ornament of the wallpaper, making the style of the room more vivid.
Colored lamps, most relevant for the children's room, will give the room a fabulous effect and can be used as night lighting.
Two-level illuminated ceilings have only one drawback - they significantly reduce the height of the room. The lower tier is mounted 15-20 centimeters below the main ceiling, which is not relevant for all rooms, especially when it comes to typical houses of the old layout. Although this flaw can be well beaten by a talented designer.
Thus, two-level stretch ceilings with lighting perfectly complement the interior, can change the geometry and mood of the room. But when installing and choosing a backlight system, it is worth remembering all the nuances and strictly observing the manufacturing technology. The best option would be to entrust all the work to professionals - a designer who will make an interesting project and installers who are able to competently perform installation.
Benefits
A multilevel ceiling is created from drywall and stretch fabric. Products from this material are quite popular, have many advantages:
- curly designs are lightweight,
- they are easy to install, it is easy to saw and give it a curved shape,
- unevenness of the ceiling is hidden under the drywall, thanks to this you will not need to carefully level the surface,
- the design disguises the electric wires,
- Using various ceiling configurations, you can create zoned areas,
- the surface in several levels is beautifully beaten by backlight,
- in the finished version, the ceiling looks great.
Ceilings come in two types: single-level and multi-level. The first option is suitable for small rooms with low and even ceilings. The second look looks good in large rooms.
Before deciding in favor of a two-story ceiling, a loss of space of 10-15 cm should be considered. Small-sized Khrushchevs cannot afford complex structures. But with the help of diverse highlights, you can beautifully beat even a homogeneous surface.


Ceiling lighting is available in two versions: hidden and open. When hidden - the lighting fixtures are not displayed, they are hidden in a drywall construction, the light coming from nowhere seems mysterious. Open lighting allows you to leave visible any light sources.

Preparatory work
Starting to install a two-level ceiling, you should prepare materials for its assembly.
- Drywall. In order not to buy extra, you need to calculate the model of the ceiling and find out how many sheets will be needed for installation. The width of the composite material is 1.2 - 1.3 meters, length - 2.5 - 4.8 meters, thickness - 8 - 24 mm.
- For mounting along the perimeter of the ceiling, a guide UD profile is required.
- Drywall sheets are marked on the ceiling profile of the CD, which will form the basis of the frame.
- Suspensions should be purchased. For deep construction you will need spring products, for small - straight.
- Sound insulation materials must be taken care of.
- If the width of the room is greater than the length of the profile, special extension cords will be needed.


- Metal dowels.
- Cross guides will be connected with the help of fasteners "crab".
- Self-tapping screws.
- Decoration Materials.
In addition to building materials, a punch, a grinder, a screwdriver, as well as a stationery knife, a level, a tape measure, metal scissors and a stepladder will be needed in the work.
It is necessary to prepare everything for finishing work. Pre-purchase putty, primer, putty knife, roller, brushes, finishing materials.


Markup
Having previously prepared the materials and tools, you can begin to work. Ceiling construction hides all the defects of the ceiling. If the old finish is held firmly, it can be ignored, but the crumbling surfaces should be well cleaned, otherwise, construction debris will be visible on the illuminated stretch canvas.
Installation of the ceiling begins with a marking, which is carried out using a laser or hydraulic level, using a previously prepared sketch. The distance from the floor is calculated, as well as the height and dimensions of the structure itself. The array of each tier is calculated separately. The level determines the lowest angle in the room. Then, with the help of a masking thread, a dividing line is drawn along the perimeter, marking of the first level is done. At this stage, the calculation is carried out and the location of lighting devices is noted.
It should be remembered that the holes for the fixtures from the sketch are transferred to the drywall and cut out even before attaching to the frame.


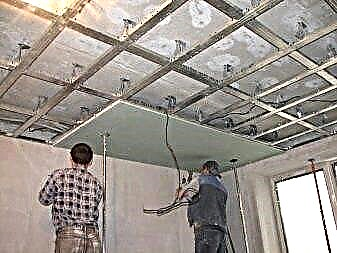
Mounting
To create a multi-level ceiling, you will need a frame, a special box that allows you to direct drywall sheets during fastening.
Work should begin with the installation of a profile that is mounted on the wall with dowels, nails. Then the center of the ceiling is calculated and located, the whole structure will be oriented on it. From the center, distances are marked in all directions. Using the masking thread, lines are drawn to secure the profile. Four rectangles are formed along the walls, consisting of a profile with jumpers.
In the work with a concrete slab, a dowel-nail is used, and the installation of drywall is carried out using self-tapping screws.

Creating a structure with curved lines, it is necessary to make cuts on the profile surface with scissors for metal. Frequent cuts (2-3 cm) help him to bend freely and take on a given shape. To create a box, each cut sheet slowly advances on the fabricated frame, passing step by step along the perimeter. The box is held with self-tapping screws and a suspension.
After installing the first tier, markup is made and proceed with the installation of the second, decorative box. It must be remembered that the sheets are not so strong as to withstand the second tier along with the lighting, so it is attached through drywall to a fixed profile.
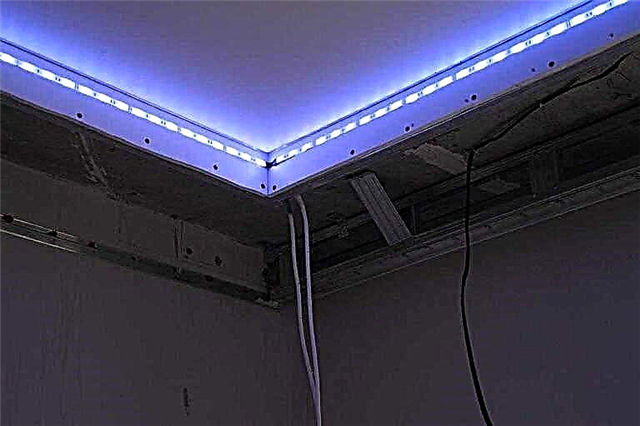
Guides are fixed on the markings on the walls. The shelves of the profile should be turned down, they will hold the box. Suspension racks are made of a profile, cutting it in parts. They are inserted into the guides and fastened with a half-meter frequency. When making blanks for the lower box, several centimeters are taken into account for mounting the LED strip. The shelves of the lower profile should look up, prepared elements are inserted into them and fixed with self-tapping screws.
Drywall is relatively fragile, any turning effort can destroy it. If the material needs to be bent, it is wetted with a wet sponge until the sheet becomes pliable. Thus, it will take the form of a prepared profile. Caution should be exercised when working with wet plasterboard, as the soft canvas tears easily. The sheets are tightly planted in the profile and fixed with screws, connecting with the lower tier.
If the ceiling structure does not require curved lines, the installation of drywall is much simpler.
At the last stage, finishing work is carried out. The box is puttied and painted. When the structure is ready, you can mount the tension web. A two-level ceiling can be created with the participation of drywall on both tiers or plastic, if the stretch fabric is not planned to be used.

Lighting
Multilevel ceilings transform the room, they are beautiful in their own right, and if they are properly decorated with lighting fixtures, they will become the dominant theme in the interior. When working with lighting, it is necessary to take into account the following points: design features, the presence of heat and sound insulation coatings, what lighting is needed for, and how much it will cost.


There are many lighting options; several types are often used to equip a multi-tiered ceiling. Types of lighting devices:
- The most common way to decorate the ceiling is light diode tape. It is flexible, multi-color, economical. It can highlight the area around the perimeter, highlight parts of the structure, certain zones. The tape is often equipped with a remote control, with the help of which the lighting of different colors is started or a pulsating alternating light is turned on. The number of LEDs in the tape is different - 70-250 per square meter. The brightness and price of the product depend on their quantity. LEDs are also installed in the form of lamps.
- Spotlights Suitable for any ceiling and budget. They are good to highlight the workplace, other areas. But do not combine them with mineral wool insulation, there may be problems with heat transfer.

- Duralight tubes used to create unique, fantastic ceilings. They can highlight mirrors, paintings and other decor items, creating a common interior theme with the ceiling. Duralight has many bright colors and looks very unusual.
- They are inexpensive and easy to install. fluorescent lamps. They are economical and, unlike duralight, durable. But they should not be used in apartments with unstable voltage.


- Neon lighting It serves for a long time and surprisingly changes the atmosphere in the room.
- Look good in spacious rooms with high ceilings. fiber optic fixtures. This new product does not take root very quickly due to the high cost and complexity of installation.
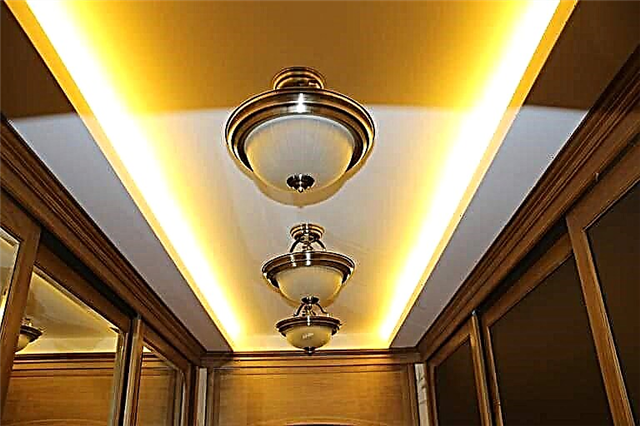
- Central chandeliers and conventional lamps no one has yet canceled, they are still in high demand. Similar products can be selected for any budget. Some chandeliers look so impressive that they become an accent in the design of the room, they have only one drawback - they reduce the height of the ceiling.
Starting to install the fixtures, the following rules should be observed:
- wires are mounted in a special box,
- the wiring should not touch the edges of the frame,
- the load of electricity should be determined before the installation of lamps,
- constructing the second level, a special ledge is formed for lighting.

Features of two-level ceilings
The stretch fabric is a universal material that has almost no restrictions on use. But two-level ceilings with backlighting have their own characteristics that need to be considered:
- The minimum permissible wall height is 2.50 meters. Otherwise, you risk getting a low and cramped room.
- Most builders call optimal height 2.80 - 3 meters - at this distance from floor to ceiling, you can afford a bold design with sharp transitions.
- You will have to provide reliable insulation of all wires: any spark can cause a fire.


For the rest, you will enjoy all the advantages of a stretch fabric, including an unusual design.
Installation Features
The technology is not very complex - especially if you chose a ceiling without drywall. In fact, all you need to do is install the frame and stretch the canvas.
But in any case, if you are thinking about installing a two-level ceiling with your own hands, we recommend that you watch this video.
However, before you begin installation, you must decide on the appearance of the ceiling that you want (color, texture, style). Therefore, we bring to your attention photos of the most interesting, in our opinion, design options.
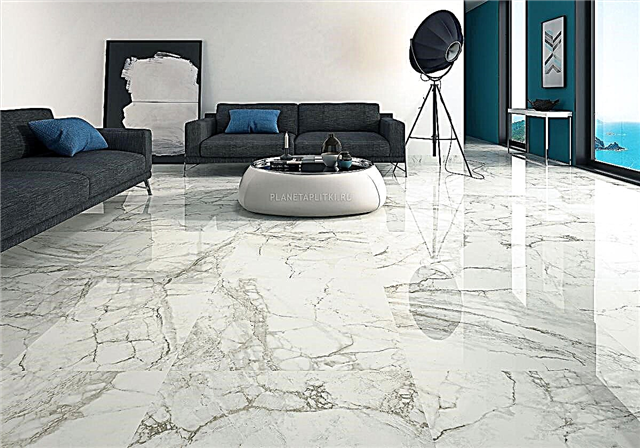
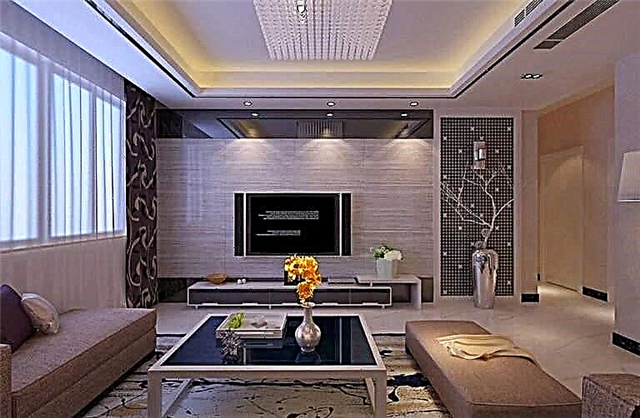
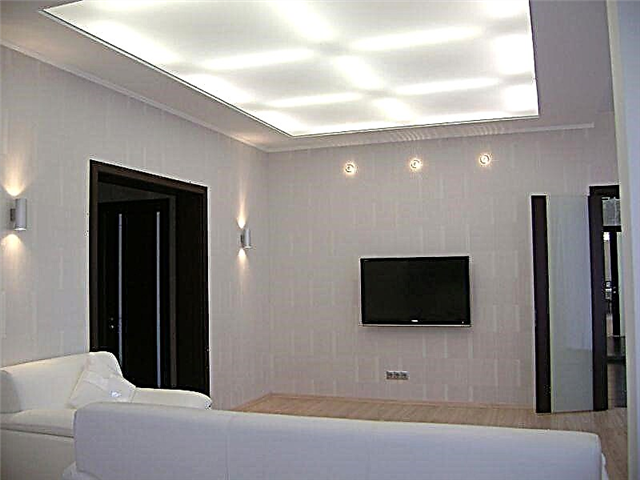
In the interior of the living room
An interesting use of backlighting is a room in white tones, complemented by LEDs to match accessories. Bright strokes on a plain background look very unusual and stylish.


The backlight must be mounted around the perimeter of the external level - so the design will seem more voluminous.
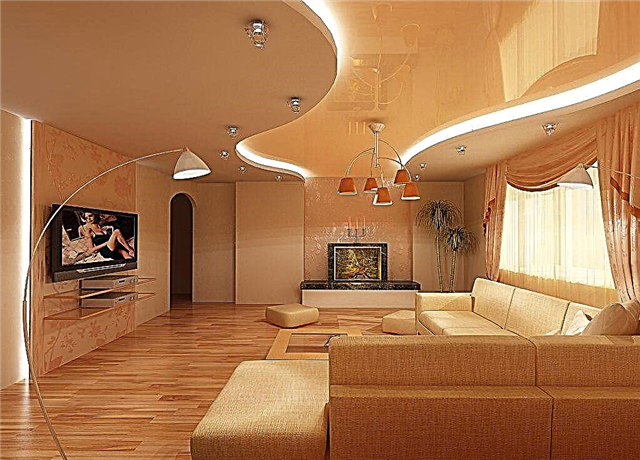
The combination of two contrasting colors and curly levels can favorably affect the external perception of a small living room. Prefer classics? Choose a black and white design. If you like vibrant hues, consider combining orange and yellow, pink and purple, and so on.


However, in this case, it is necessary to carefully select the shade of the backlight if you do not want to get a distorted tone of the ceiling. Remember that the light from LED strips can significantly change the color perception, so it is better to consult with designers.
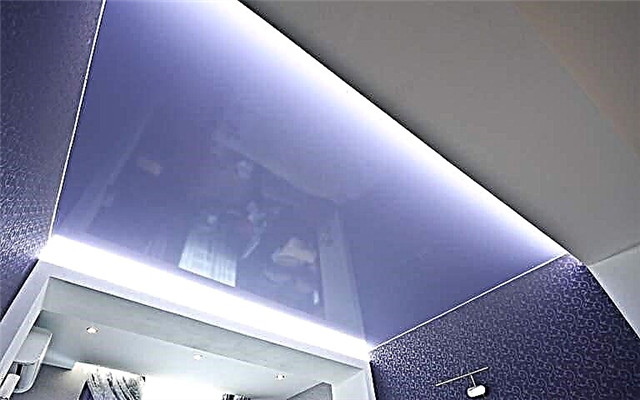
Hidden lighting under the lower level is an excellent design technique that will suit both small and spacious halls. It helps to create the effect of a soaring ceiling (supplement it with LED strips around the perimeter to enhance it) and just looks very nice.

You can try this: Install such a backlight on the ceiling with photo printing. For example, a flickering impression is made by flickering laser beams deposited on the canvas. Agree, it looks very original?
Two-level stretch ceilings with lighting in the hall, as in this photo is a good example of a high-tech interior. In addition to the design itself, you will need a hidden curtain rod and curtains to the floor.
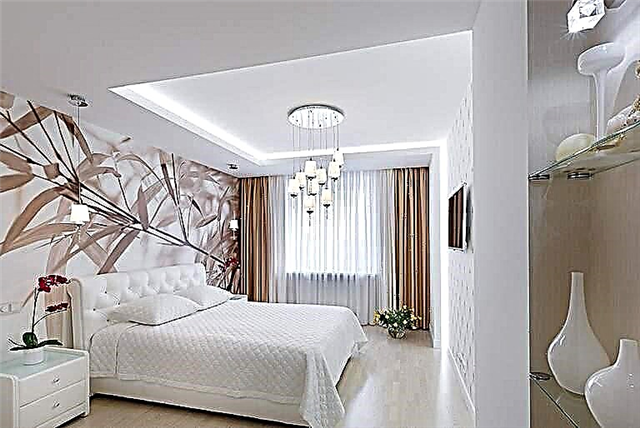
In the interior of the bedroom
For a bedroom, two-level ceilings may be ideal. The soft light that will replace the nightlight, a beautiful and extraordinary design ... Let's see how this is implemented in practice?

The complex shape with hidden backlight and photo printing will not leave you indifferent. We recommend ordering drawings on a space theme: the planet looks so real that you will feel in outer space.
LED stripes complement this effect. You can choose them as contrasting to the main background or prefer faint flickering, which will seem like a natural reflection of a celestial body. The choice is yours!
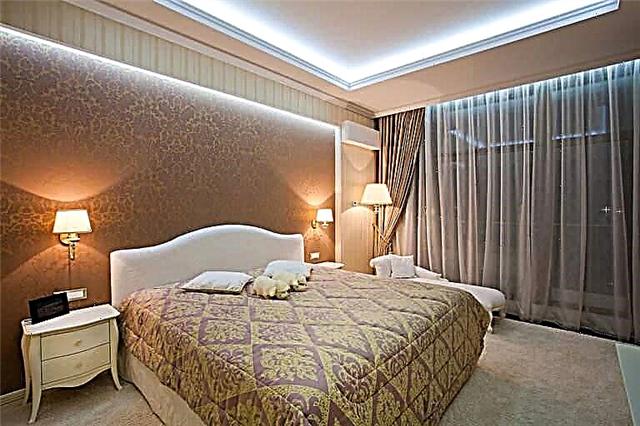
Backlit patterns matching the walls and decor will appeal to romantic natures. Agree, a very sophisticated bedroom design.
Backlit starry sky is another classic trick that does not lose its relevance. It looks especially good on a two-level ceiling: the stars seem to be framed by a light background. You can read more about the types of such design in this article.

The soaring ceiling in the bedroom will complement ... the same bed! To do this, you will have to make a protruding coating level symmetrically to the furniture and use the same LED strip. Not the easiest and quite expensive design, which looks stunning. We recommend you try it for spacious rooms with high walls.
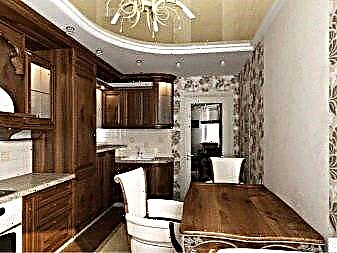
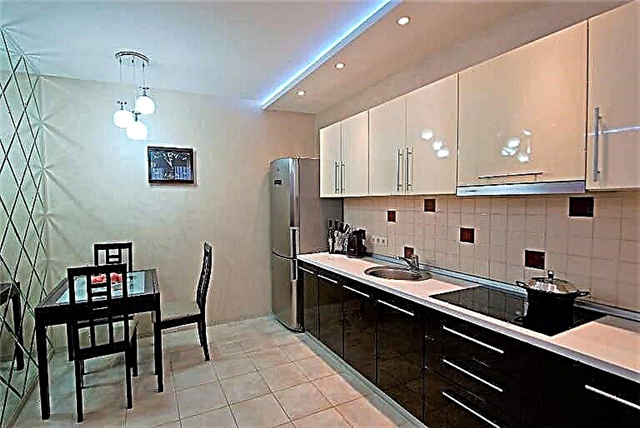
In the interior of the kitchen
Two-level structures are ideal for zoning the room: in separate kitchens you can distinguish a working area or dining room, and in the studio apartment they help create a border with the living room.
However, if there is no such need, you will undoubtedly like the design with lighting to match the furniture. Choose bright LEDs - green, orange, purple.

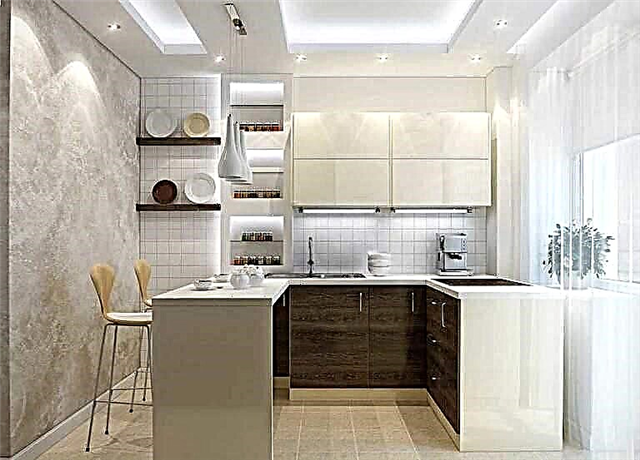
Minimalist modern design for small kitchens. We recommend that you complement it with an original apron with a print.
Take the stretch fabric in the color of the walls, and in the center, place the contrasting insert highlighted around the perimeter. This technique is well suited for a kitchen with a bay window.
Separate the kitchen from the living room using level transitions. The LED strips mounted along the border will help to make them more obvious - agree, a convenient method for a studio apartment.
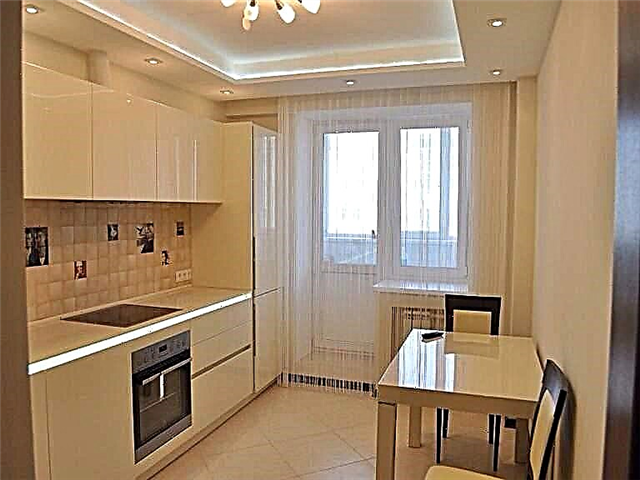
This method looks beautiful with a plain canvas. However, if you want to play with flowers, why not? The main thing to remember the basic rule of color matching is to combine no more than three basic shades.

A simple square design will adorn a chandelier of a similar shape. Choose an elegant lamp with a decor in the tone of the backlight. Elementary at first glance, the method will turn an ordinary ceiling into a design one.
In the interior of the nursery
In this room you can move away from the usual restrained tones and give free rein to imagination: bright colors, prints, decor ... Illumination will help to create a truly original interior.
The two-level design with a “starry sky” print, decorated with two curly themed chandeliers, will not leave indifferent any child.
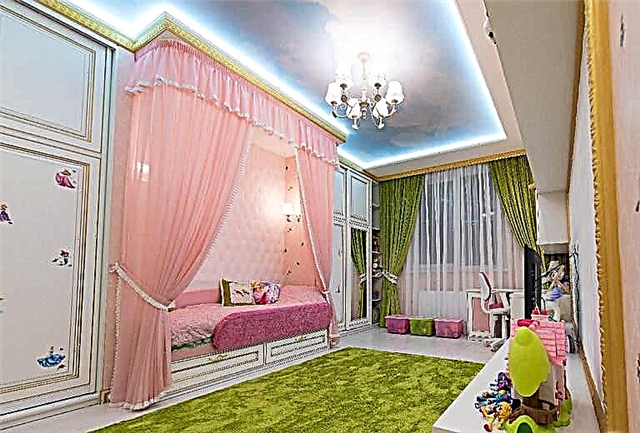

Are you repairing a room for your daughter? She will like the clouds soaring under the ceiling with flickering lights. Choose it to match the finish to make the effect more natural and soft.
Beautiful reception: Place a print-shaped canvas on the upper level, and install LEDs under the petals. This design looks unusual and your child will certainly enjoy it.


The backlight can also be of a non-standard shape - for example, in the form of a butterfly or the outline of any animal. True, it is quite difficult to independently establish such a coating: not everyone will be able to carefully mount curly level transitions. Therefore, it is better to turn to professionals who have experience in such work.
A bright multi-color ceiling requires appropriate framing: choose LED strips in saturated colors and do not focus on one tone. But we believe that the appropriateness of such a design is doubtful: it looks, of course, attractive, but there is a risk that it will tire the child. Moreover, such an interior is boring in a matter of months. Maybe you should choose a more relaxed option?

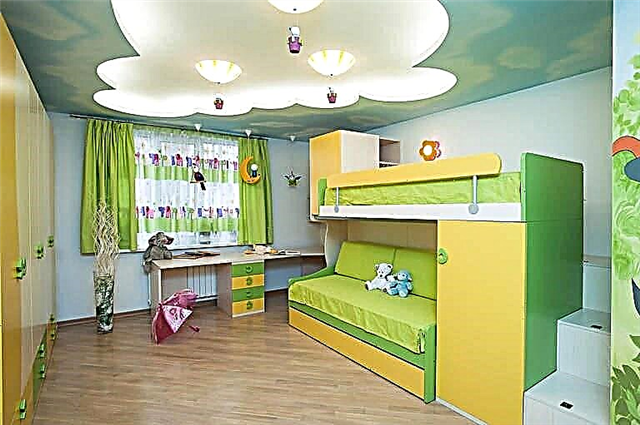
For example, a beautiful landscape - a backlit sky, the crowns of trees act soothingly. Yes, and they look very elegant. We think your child will like this room decoration.
In the interior of the office
If you often have to work at home and you have the opportunity to equip a working room in the apartment, think about the appropriate interior.
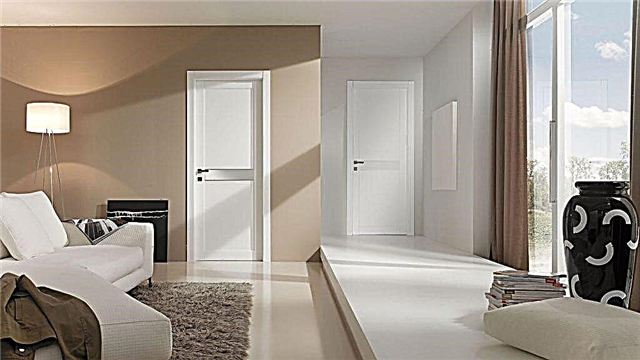
It is better to choose classic shades of the canvas. A beige two-level ceiling with hidden lighting will look beautiful. Give preference to geometric shapes and clear lines - this will help give the room a more solid look. Few people are able to take seriously a person whose office is decorated with asterisks or flowers, right? For spotlights, buy spotlights or simple chandeliers.
Want an original design? For one of the levels, take a translucent stretch fabric and install LED strips in the form of curly patterns to your liking.
You can experiment with a combination of colors. Classic options for the office: beige with brown, white with blue, black with red ... But if you equip it in your house or apartment, what prevents you from moving away from these standards?
In the bathroom
If the height of the walls of the bathroom allows, such a ceiling can help to create a unique interior.
The most popular and affordable option is a two-level design with internal level illumination along the perimeter. Choose the colors of the canvas to match the basic design of the bathroom. Such a ceiling is well suited even for a small room if you do not make strong transitions: an indent of five to ten centimeters is enough.

You can make curly inserts. This will require certain skills, so order a painting from builders. For such a design, the clarity and accuracy of the lines is extremely important, otherwise the effect will be smeared and the bathroom will look sloppy. Highlight the decorative elements with LED strips.

A complex ceiling with various curls is more suitable for a spacious room. LEDs in this case are best placed not around the perimeter, but in a random order. In addition, we recommend that you do without a chandelier - it will attract attention and overload the interior. Here, additional decor is not needed.

Want something simpler but no less aesthetic? Choose a two-level design with an interesting shape. For example, in the form of a drop of water or an unusual petal. The choice of color is up to you: a bright monophonic canvas will look no worse than the usual white one.
In the interior of the corridor
Such ceilings are a real find for creating an original interior in the hallway. Do not believe? See for yourself!
A narrow long corridor can be decorated with several square or round inserts of bright colors. Highlight them from the inside for a futuristic effect. Agree, so the impression of actually the most boring room in the house is changing dramatically.


Do you have a spacious entrance hall? White background, clear lines and bright LED stripes will help emphasize this. No need to go in cycles on standard geometrical forms - broken lines look beautiful and original.
A wavy insert illuminated by neon colors is an excellent choice for an elongated wide corridor. Install spotlights instead of a standard chandelier.


An interesting fact: Modern LED strips are not just tubes with diodes, but a real miracle of technology. You can easily change the color and mode of operation (even glow, flicker, bright flashes) using the remote control. The price for them is higher than for standard ones. But the corridor will look new almost every day!
The illuminated canvas with prints is also suitable for decorating the hallway. Choose a picture to taste, making sure that it does not visually conflict with furniture and walls. Beautiful decoration, isn't it?

As you can see, illuminated two-story stretch ceilings are almost universal: they can be installed in any room, they are suitable for almost all types of interior. We hope that our selection of photos will inspire you to create your own unique design of your house or apartment.
Drywall ceilings - it’s profitable
There are many modern ways to turn a ceiling into a work of art. These are suspended systems, suspended ceilings, and special plastic panels, and expanded polystyrene ceiling tiles, and metal structures. Nevertheless, the ceiling of drywall is still in demand. Why?
The first and main reason is the relative cheapness of such a method. During construction and repair, many people have to count every penny. And the ceiling of gypsum sheets will save a little.
Another positive point: the suspended structure will hide all the defects of the old ceiling, as well as wires, ventilation covers, pipes, etc. objects spoiling the design of the room.
The third plus can be considered the uniformity of the texture of the walls and ceiling. If the walls are finished with GKL, it is logical to sheathe them and the ceiling. You just need to buy a little more material. In addition, the ceiling can be made both simple and unique. Nothing holds back the flight of fancy in this method, except for the contents of your wallet.
It is also important that any man who knows how to use the building level and a screwdriver is able to mount a two-level suspended ceiling from drywall with illumination on his own. Of course, you have to dig deep into the Internet in search of information, ask your friends for help, and find a few days off from your main job. But the result is worth it.
First you need to draw or find a photo of your favorite ceiling on the Internet. Measure the ceiling and draw some drawings. A two-level ceiling made of drywall with a backlight is a rather complicated design and you won’t be able to do it “by eye”. Separately, draw the layout of the main and spotlights, determine the type of illumination between the levels. The most common LED strip, but you can use other light sources.
Photo of beautiful two-level ceilings


Do it yourself exquisite ceiling
If you have experience in the construction industry, tools and free time, you can try yourself in the role of a professional finisher. It is difficult to make a two-level ceiling from drywall with your own hands, but it is quite possible for every master who is not afraid of dirty work. In the sense - dusty, because gypsum leaves a lot of dust.
Calculate in advance and purchase all the necessary tools and finishing materials. Their range and quality are selected according to the amount that it was decided to spend on repairs.
It’s better to take “barely enough": in any locality materials for such ceilings are higher than the roof and you can buy them, if not enough, at any time. But where to put the remnants after repair in a small apartment is a big question! And it’s a pity to throw out - money does not lie on the road, and nowhere to put. However, everyone must resolve this issue on their own.
There are several leaders in the production of gypsum products and materials:
- Knauf. The company occupies a leading position in our market, and throughout the world. Drywall and everything to finish with this material. Quality tested by time. Among the assortment is arched gypsum board with a thickness of 6.5 mm. A great choice for creating curved lines of a two-level ceiling.
- A company from Scandinavia, "obsessed" with environmental friendliness. Their products are in high demand all over the world. Many products are more expensive than its German competitor.
- Lafarge Group. The Polish company scattered its plants around the world. European quality products at very affordable prices. In our market, it is not as well known as Knauf. The first to establish the production of gypsum plaster with a semicircular chamfer on all four sides of the sheet.
- Gypsum OJSC. The only Russian company whose product quality corresponds to European losses, and the product range is wide and diverse. Based in Volgograd. Products with the Volma logo can be seen at all construction sites in our country.
As for the components. The most famous and expensive in our market are from Knauf and Gyproc. Most of the other manufacturers are small private Russian factories. So there will be no problems with the acquisition. The same wide selection of accessories - from expensive to luxurious - for lighting installation.
Materials and tools that are useful during installation
A two-level ceiling made of gypsum boards with do-it-yourself lighting will require a lot of materials and tools. If there are drawings with dimensions, the approximate amount of a particular material is easy to calculate. You will need sheets of ceiling drywall 9.5 mm, a sheet of arched drywall 6.5 mm to finish the curving level transition lines. If the 2nd level is direct, buying an arched drywall does not make sense.
In addition, you need a primer and putty on gypsum, a self-adhesive tape (sickle) for sealing joints, a damping tape to improve sound insulation.The metal frame is mounted from ceiling guide profiles (PNP), ceiling profiles (PP), arched profiles, direct suspensions, single-level suspensions (crab). For fasteners use dowel nails, anchor wedges, metal screws 3.5 to 9.5 black ("seeds" in the jargon of masters) or white PSh, as well as black screws for drywall.
All this can not be mounted with a hammer and a screwdriver. Therefore, you need to cook or buy the necessary tools. In addition to the above, you will need laser and bubble levels, scissors for metal, a hacksaw with small teeth, a painting cord (beating), a tape measure, a stationery knife for cutting drywall, a plane, an emery cloth or painting net, a screwdriver, a puncher, spatulas of different widths for puttying the finished .
Do not forget about lighting. Two-level plasterboard ceilings with backlighting, in addition to the central chandelier, must be equipped with LED strip, duralight or neon lamps. In addition, you can add spotlights with a voltage of 220 volts on both the first and second level of the ceiling. Their choice is huge and a simple listing will not do anything. Everything is decided by a specific choice of style and design of the ceiling structure.
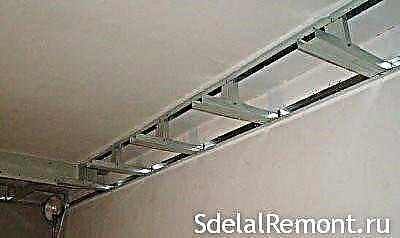
Longitudinal PP on the ceiling
It remains to mount the cross bars. Their length is 1 cm less than the distance between the longitudinal profiles. They are fastened with single-level connectors (crab) with intervals of 50 cm. This is done so that the edge of the drywall sheet - and its length is a multiple of 50 - falls in the middle of the transverse profile for convenience and reliability of fastening. All connections are fixed with screws. The result should be a design, as in the photo above. Then the wiring is mounted. Be sure to place the wires in a corrugated non-combustible pipe. We make loops in the placements of spotlights or chandeliers.
In order to avoid the penetration of screws, it is forbidden to lay inside metal profiles.
The resulting crate is sheathed with drywall. For fastening, black self-tapping screws with a small thread pitch of 4-5 cm are used. The distance between the self-tapping screws is taken equal to 20 cm, the distance to the edge of the sheet is 2 cm. This will protect the sheet from destruction. Hats of self-tapping screws are slightly recessed into the surface, later they are masked with plaster.
If the sheet has to be cut into pieces, an edge is made on the cut part with a planer or a sharp knife. Then the cut is necessarily cleaned with sandpaper.
The seams of the first level are a rough layer of plaster using a sickle. On this, the first stage of installation of a two-level ceiling with backlighting from drywall is completed.
The beginning of the second stage is identical to the beginning of the first. We retreat down the wall 12-15 cm. Why so many? Once the ceiling is illuminated, then this is just the case: the height of the side that obscures the light source + the ability to put your hand into a niche to replace a burned-out element.
Scheme of the device of the second level of the ceiling with a niche for lighting
So, below the ceiling on the walls we make marks, connect with lines and mount guide profiles. If the second level is planned around the perimeter of the room, the guides go along all the walls. If it is a diagonal, then the profile is fixed only in those places where the second level is adjacent to the wall.
The second ceiling level is usually curved. To create smooth bends, it is best to use an arched profile. But most "masters" prefer to save. They cut triangles on the sides of the ceiling or guide profile as often as possible and bend it according to the drawing. The drawing is best applied to the ceiling of the first level. This line is repeated, departing from the future edge of the second level in depth by 10-15 cm. This distance can be less if you use LED strip or duralight in the lighting. Here will be held the fastening of this level to the first.
We cut pieces of the ceiling profile 12-15 cm long (level height). These pieces will replace direct suspensions. We bend and mount an arched profile or a rugged guide profile on the ceiling in an internal curving line. We attach pieces of the suspension to it. We connect their lower edge with the PNP, mounted on the wall, using pieces of PP. The length of these segments should be equal to the distance from the wall to the outer, extreme winding line of the future level. If the length of such segments is more than 60 cm, it is recommended to make transverse inserts from single-level connectors and PP sections.

Try to keep the structure as rigid as possible. The final touch will be the edging of the protruding PP guide profile with cut sidewalls. It is bent so that when viewed from below, the line of this profile repeats the bends of the pattern on the ceiling. The resulting edging is fixed with screws. The frame is ready.
 Corrugated wiring on the ceiling
The wiring is mounted similarly to the first level. The location of spotlights is marked on the ceiling.
Sheathing the resulting frame with drywall will be the next step. The smooth surface is sheathed as described above for the first level. The edges are cut along the bend line. The problem will be sheathing the end face of the second level. There are two proven methods for this:
- A strip of drywall is pierced from the inside with a needle roller or the tip of a knife. Then the surface is wetted with water using a sponge or rag. Moisture impregnates gypsum and a strip is applied to the profile. They bend it slowly and carefully, fixing it in stages to the profile with self-tapping screws.
- The inner side of the strip is cut V-shaped to the outer cardboard at small intervals. In this case, the strip will repeat the profile bend. But this method is only good for small sites.
Next, the drywall is primed, the rough and finishing layers of the putty are applied using spatulas. Holes for spotlights are cut, an LED strip and other track light sources are mounted in a niche. Contacts are well insulated and hidden. The surface is painted in selected colors. A two-level plasterboard ceiling with do-it-yourself lighting is ready.
Drawings of a two-level ceiling frame with a niche
We consider in detail various schemes for the installation of drywall flows with a backlight device in one and two levels.


What you must not forget during work
Installation of a two-level ceiling made of drywall with backlight It will not be an impossible task if you adhere to several rules.
- You need to believe in yourself :).
- Thoroughly develop sketches and drawings of the future ceiling, starting from the layout of the frame of each level and ending with the location of each lamp. Make sure that the lamps do not coincide with the crate.
- Choose quality-tested materials that will last you decades.
- Do not rush. Start the next stage of work, only having completed the previous one.
- If problems arise, carefully study all available material in order to choose the most simple and effective way to resolve it.
- Feel free to use the help of friends. It is almost impossible for one to cope with such work without experience.
- It is advisable to entrust the work with electrical wiring to a professional.
If all of the above does not scare you, then good luck! In addition, watch the video on the installation of ceilings.
What will give a two-level ceiling in the interior of the living room?
Any designer can easily answer this question, with the help of color and an unusual shape, you can give your living room your personality and hide minor defects. Two levels help divide the room into zones, hide all communications and rough work on the ceiling.

When combining a stretch ceiling and a drywall construction, you can give an airy, light texture in the center of the room and fancy shapes on the sides, but this option is only suitable for large rooms.
The drywall part is best done smoothly, in the form of drops, ovals, waves - this will give the living room comfort. For the classics in the interior, rectangular shapes are suitable, in the form of a rhombus, square, sharp lines. The ceiling looks beautiful, where one level is matte and the other is glossy with backlight.

It is necessary to observe the harmony of the pattern on the ceiling with the wallpaper, the main thing is that they do not contradict each other and have the same style.
The only downside is that the ceiling is soft and can be cut through. Also, the ceiling will not last for long if improperly installed using high temperature.
Color of suspended ceilings in the living room
Glossy as well as matte ceilings are popular. In the living room, these two textures can be safely combined. The gloss is more refined and sophisticated, and the matte surface looks more comfortable and warmer. Designers often combine different colors of two-level ceilings, making the context dark and light. Now they have become popular shades of one spectrum, smoothly turning into each other.

It looks most advantageous when one level of calm, pastel tones is matte texture, and the pendant design stands out with a bright accent, either dark or bright tones.

Texture
The ceilings come from seamless fabric and polyvinyl chloride. Small seams appear on the film, they are difficult to notice, because they are very thin. It is very easy to make bunk ceilings from such a film, since it is easy to cut and can take any shape and design. Polyvinyl chloride has a greater variety of colors, you can create an imitation of stone, silk, metal and mother of pearl.


Seamless fabric comes in rolls up to 5.6 m and can only be matte, such a ceiling can be painted as you wish and it has a breathable structure, choose material from polyvinyl chloride with perforation.
You also need to keep in mind that the matte surface is practically maintenance free, and glossy material is more demanding for cleaning. Both varieties withstand weight up to 100 kg and are moisture resistant.
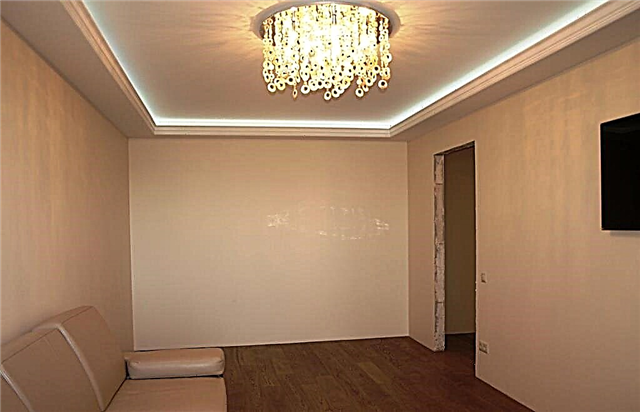
Lamps in suspended ceilings in the living room
Since we are talking about the ceiling in the living room, it should look expensive and presentable. Designers use lighting effects by running around the perimeter of the LED strip and highlighting the desired areas. It looks stylish and luxurious. To expand the area, a glossy ceiling with spotlights or imitation under a mirror is used.

Since the stretch ceiling can withstand tens of kilograms, it is necessary to calculate the weight of the fixtures at each level. A tension system is mounted in the first drywall level, then the cornices are built into the second level. Lamps are already embedded in a soft cloth, they can be either point or suspended.

If the choice fell on pendant lights, then they are attached to the main ceiling. It is better to use spotlights in the living room at each level of the ceiling, this will give the room a soft, diffused light that is pleasing to the eye.

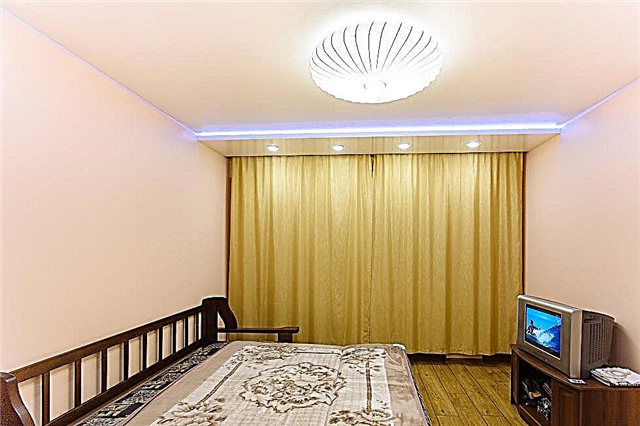
In the two-level ceiling, an eaves illumination is often mounted, it gives mystery and muffle, the illusion of soaring of the suspended structure is also created.